Table of Contents
- Expand Your Creative Vision with ColorPlay 4
- 1. Getting Started Install ColorPlay
- Connect to a Color Kinetics Lighting System
- Configure Static IP Address to your computer on Windows:
- Configure Static IP Address to your computer on Mac:
- 2. Meet ColorPlay 4
- ColorPlay 4 Content Authoring Process
- ColorPlay 4 Tools
- ColorPlay 4 User Interface
- 3. In the Beginning: Importing the Site Topology
- Step 1: Layout Creation
ColorPlay 4 Quick Start Guide
Expand Your Creative Vision with ColorPlay 4. Welcome to ColorPlay 4, our next-generation creative authoring software, which puts a wide range of capabilities at your fingertips so you can create gre…
- Expand Your Creative Vision with ColorPlay 4
- 1. Getting Started Install ColorPlay
- Connect to a Color Kinetics Lighting System
- Configure Static IP Address to your computer on Windows:
- Configure Static IP Address to your computer on Mac:
- 2. Meet ColorPlay 4
- ColorPlay 4 Content Authoring Process
- ColorPlay 4 Tools
- ColorPlay 4 User Interface
- 3. In the Beginning: Importing the Site Topology
- Step 1: Layout Creation
Expand Your Creative Vision with ColorPlay 4
Welcome to ColorPlay 4, our next-generation creative authoring software, which puts a wide range of capabilities at your fingertips so you can create great light shows, quickly and easily. ColorPlay is an important part of the complete Color Kinetics creation and control portfolio, which also includes QuickPlay Pro 2 for advanced device control. This innovative portfolio simplifies and streamlines the entire show-creation process, from commissioning Color Kinetics lighting systems to creating layouts and original content to playing, sharing, and managing final shows. The innovative shows you create with ColorPlay 4 can be used across the full range of Color Kinetics controllers.
ColorPlay 4 offers the timeline-based show editing that designers prefer and an extensive array of sophisticated but easy-to-use tools—all in one creative content authoring environment. Animated effects, video, dynamic color—the possibilities are limitless. ColorPlay 4 layout tools make it easy to draw different shapes and group your lights, unlocking new creative potential. You can create more engaging and immersive experiences and differentiate your work. And you can push your creative boundaries further, achieving your full artistic vision.
Using ColorPlay 4 to author content for Color Kinetics lighting solutions requires three main steps—layout creation, content creation, and content management. This quick start guide will describe each of the three steps and introduce you to the many creative tools that will help you author innovative light shows.
The rest is in your hands—and your imagination.
1. Getting Started Install ColorPlay
ColorPlay is a software application that must be installed on your computer to begin content authoring.
The ColorPlay Installer is available for Windows and macOS systems.
Download ColorPlay Installer
- Download the Installer at
- Format of the file name for the downloaded file is:
- ColorPlay-<System Environment>-<Version>-<Date>-<Build>.zip
- System Environment: Supported Environments is indicated in the file name. Win / Mac.
- Version: Version number of the application. For example: 2.0.4
- Date: Reference date when version of application is made available. For example: 20210101
- Build: Reference build number of the application. For example: 1234
- Extract the contents of the Zip file to a suitable location.
- You will notice two files:
- Release_Notes.html – Refer to the information regarding change history of versions.
- ColorPlay<MajorVersion>Installer – Installer executable.
Install ColorPlay on Windows
Double-click ColorPlay<MajorVersion>Installer.exe to begin installation and follow the on-screen prompts.
In certain computers, due to the IT restrictions to install software, you may have to do one or more of the following alternatives:
- Right-Click and then Click ‘Run as Administrator’ ColorPlay<MajorVersion>Installer.exe to begin installation and follow the on-screen prompts.
- Consult your IT administrator if the IT policy restrict installation of any software on the computer.
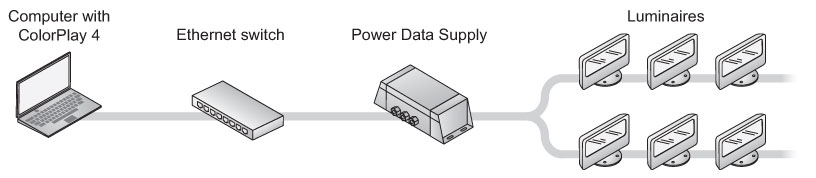
Connect to a Color Kinetics Lighting System
Color Kinetics Lighting System must be a KiNET (Ethernet) Lighting Installation. You can connect your computer directly to an Ethernet Switch in the network of the Lighting Installation.
By default, Ethernet devices from Color Kinetics are assigned an IP Address in the 10.x.x.x range. Typically, the lighting network is configured with static IP Addresses in the 10.x.x.x range with Subnet Mask of 255.0.0.0.
You must ensure that your computer is configured with IP Address and Subnet Mask to connect to the lighting network.
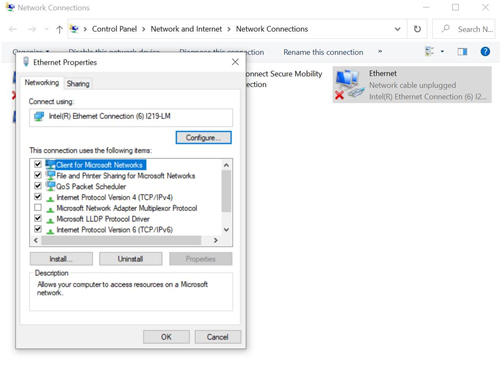
Configure Static IP Address to your computer on Windows:
- From the Start menu, select Control Panel, and then double-click Network Connections. The Network Connections window is displayed.
- Double-click the Local Area Connection icon associated with the computer’s integrated network card. Disable your wireless network card and any VPN connections, if applicable.
- In the Local Area Connection Status window, click Properties. The Local Area Connection Properties dialog is displayed.
- Select Internet Protocol (TCP/IP), then click Properties. The Internet Protocol (TCP/IP) Properties dialog is displayed.
- Select Use the following IP address. Enter an IP address of 10.1.2.3 (or another IP address in the 10.x.x.x range) and a Subnet mask of 255.0.0.0.
- Click OK to return to the Local Area Connection Status window, and then click Close.
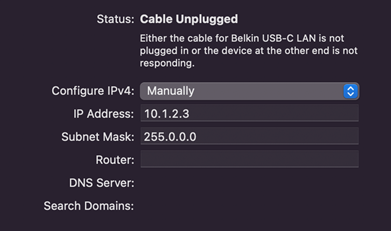
Configure Static IP Address to your computer on Mac:
- From the Apple menu or the Dock, open System Preferences, and then click the Network icon.
- From the Location list, select Automatic.
- Select your Ethernet device from the left pane.
- From the Configure IPv4 list, select Manually.
- Enter an IP Address of 10.1.2.3 (or another IP address in the 10.x.x.x range) and a Subnet Mask of 255.0.0.0.
- Click Apply.
You have now physically connected your computer to the Color Kinetics Lighting System.
2. Meet ColorPlay 4
ColorPlay 4 helps users through every stage of the content authoring process, getting lighting designers to their goal—an impressive light show that achieves their creative vision—more quickly and easily. A wide array of tools simplifies the creative process. And ColorPlay 4 features an intuitive user interface that serves as a comfortable, easy-to-use working environment.
ColorPlay 4 Content Authoring Process
Stage | Description |
Import Site Topology | The outcome of the Commissioning Process (using QuickPlay Pro 2 or Management Tool) is a Site Topology. This Site Topology consists of the light points, their configuration, and their hierarchical topology in the lighting system. The Site Topology is captured in the form of a ‘map file’. Import of the Site Topology is the starting point for the Content Authoring Process. Recommended: Refer to the Light System Manager User Guide (pg 20-24) for information on how to export Site Topology (Map File) from Light System Manager. Refer to the QuickPlay Pro 2 Quick Start Guide for information on how to export Site Topology (Map File) from QuickPlay Pro 2. |
Layout Creation | Layout Creation Workflow is the first step of Content Authoring Process. Outcome of this step is a deterministic layout of the Lighting System. A deterministic layout includes alignment of light points and grouping of light points. It is captured in the form of a ‘map file’. |
Content Creation
| Content Creation Workflow is the second major step of Content Authoring Process. Outcome of this step is a Light Show. A Light Show is a combination of one or more light effects applied on one or more groups of light points in a sequence captured on a timeline. It is captured in the form of a ‘show file’. |
Content Playback | Content Playback Workflow is a part of the Content Creation Workflow in the Content Authoring Process. This step can be used to perform a live playback of the Light Show on the lighting system. |
Content Management | Content Management Workflow is the third step of the Content Authoring Process. This step is used to upload Content Created in Layout Creation and Content Creation Workflows to a Playback Controller. |
ColorPlay 4 Tools
Tool | Description |
Workflow Tool | Displays the list of functional workflows – Layout, Show, and Network |
Device Tree | The Device Tree tool is used to work with the light point(s) in the Site Topology. This tool helps in navigating through Site Topology and selecting light point(s) in the lighting system. |
Group Tree | A group is a collection of light point(s).The Group Tree tool is used to work with the group(s) in Site Topology. This tool helps in navigating through the site topology and selecting group(s) in the lighting system. |
Effects Tree | A Light Effect is a dynamic color changing pattern that can be applied to a group of light point(s). The Effects Tree tool is used to work with the library of Light Effects available for Content Creation. |
Network Tree | ColorPlay runs on a computer that can be connected to one or more Networks. The Network Tree Tool is used to select a network interface on the computer to be used for Downstream Communication. Downstream Communication is used to render the content live to the light points in the Content Creation Workflow. |
Controller Tree | Content created using ColorPlay is rendered to the Lighting System using Playback Controllers. The Controller Tree Tool is used to work with the Playback Controller for Upstream Communication. Upstream Communication is used to upload/download content to/from the Playback Controller. |
Map Tools | Map is a visual representation of relative positioning of the light point(s). The Canvas Tool is used to display the layout of Site Topology. The Zoom Tool is used to zoom in/out of the layout displayed on canvas. The Fit to Screen Tool is used to reset the zoom level to display the entire Site Topology. The Pan Tool is used to pan across the displayed zoom level of canvas. The Select Tool is used to select light point(s) using Shape Selection Tools on the canvas. The Move Tool is used to move selected light point(s) to desired position on the canvas. The Background Tool is used to apply a reference background image to the canvas. The Gridlines Tool is used to display/hide reference gridlines that help in organizing the layout of light point(s) |
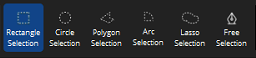
Shape Selection Tools | A collection of Shapes - Rectangle Tool, Circle Tool, Polygon Tool, Arc Tool, Lasso Tool, Freeform/Pen Tool can be used to draw an overlapping shape to create a collection of light point(s). |
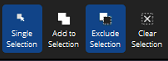
Shape Modifier Tools | A collection of Modifiers – Single Selection Tool, Add to Selection Tool, Exclude Selection Tool, Clear Selection Tool can be used in combination with Select Tool (from Map Tools) and Shape Selection Tools to create a complex region of light point(s) using composite shapes. |
Alignment Tools | A large collection of Alignment Tools can be used to adjust the alignment of light point(s) on the canvas. They include the following tools. Horizontal Alignment: Align Left, Align Center, Align Right Vertical Alignment: Align Top, Align Middle, Align Bottom, Even Distribution: Distribute Horizontally, Distribute Vertically, Distribute to Grid Rotation: Rotate Clockwise, Rotate Counterclockwise, Rotate by Angle, Flip Horizontal, Flip Vertical
|
Timeline Tools | The Play / Pause Tool can be used to control the live playback of light show. The Configurable Frame rate Tool can be used to set a frame rate for live playback. The Seek Timeline Tools can be used to seek the timeline of light effects in the light show, including Seek Forward, Seek to Next Effect, Seek Backward, Seek to Previous Effect, and Seek to the Marker. The Timeline Zoom Tool can be used to adjust the granularity of the timeline. Dock Tools can be used to dock/undock and adjust the size of the Timeline Widget. |
Connection Status Tool | The Downstream Status Tool indicates the connection status of the downstream communication used for live playback of Light Shows on Lighting Network. Upstream Status Tool indicates the connection status of the upstream communication used for the content management on selected Playback Controller. |
Color Control Tools | The Color Control Tool provides the ability to select a desired color and render it with accuracy and consistency across different family of luminaires. Playback Engine utilizes the Chromasync Technology to achieve the accuracy and consistency across a variety of LED Chemistries – RGB, RGBW, RGBA, IntelliHue etc. The Channel Control Tool provides the raw channel level control capability to the user. In this mode, Playback Engine will not perform any calculations to ensure color consistency, instead it will use the raw channel levels specified by the user. |
Properties Tool | The Properties Tool presents the available properties that can be configured for a selected – Group or a Light Effect in Layout or Content Creation Workflows. |
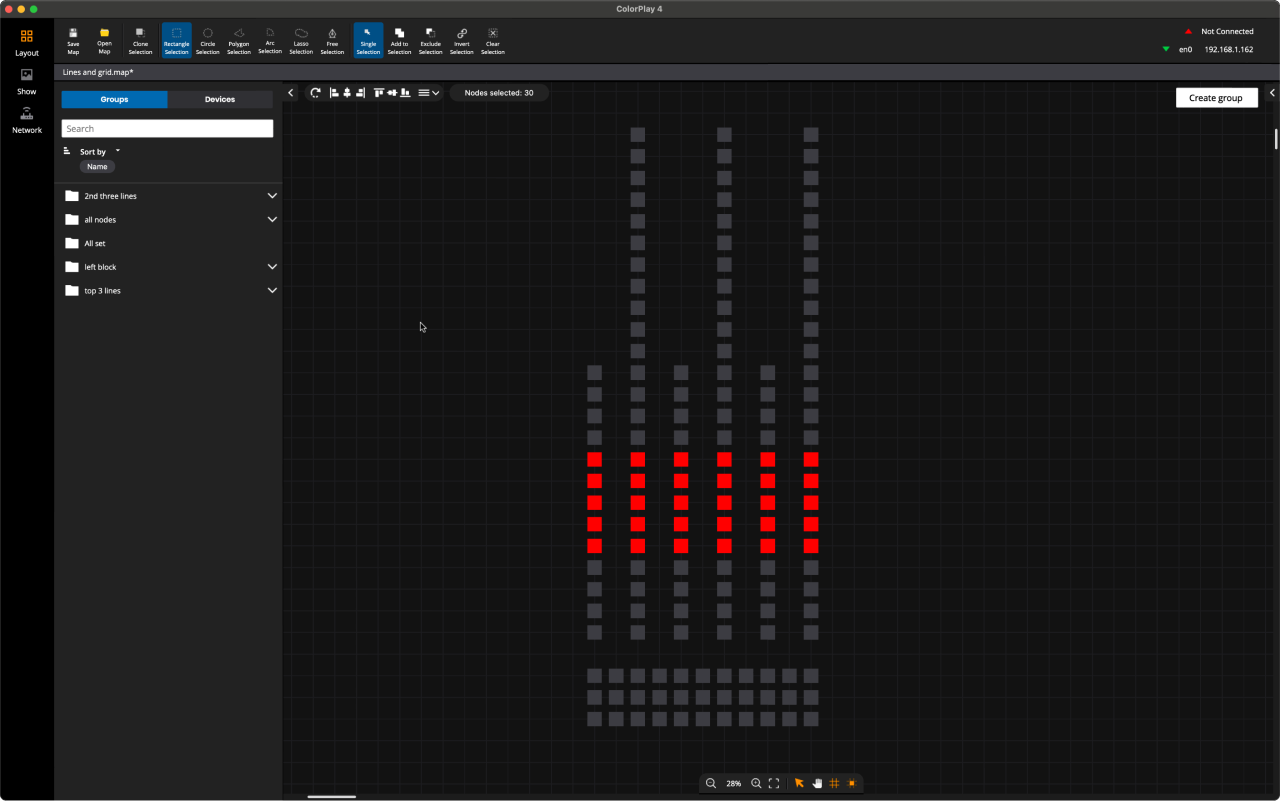
ColorPlay 4 User Interface
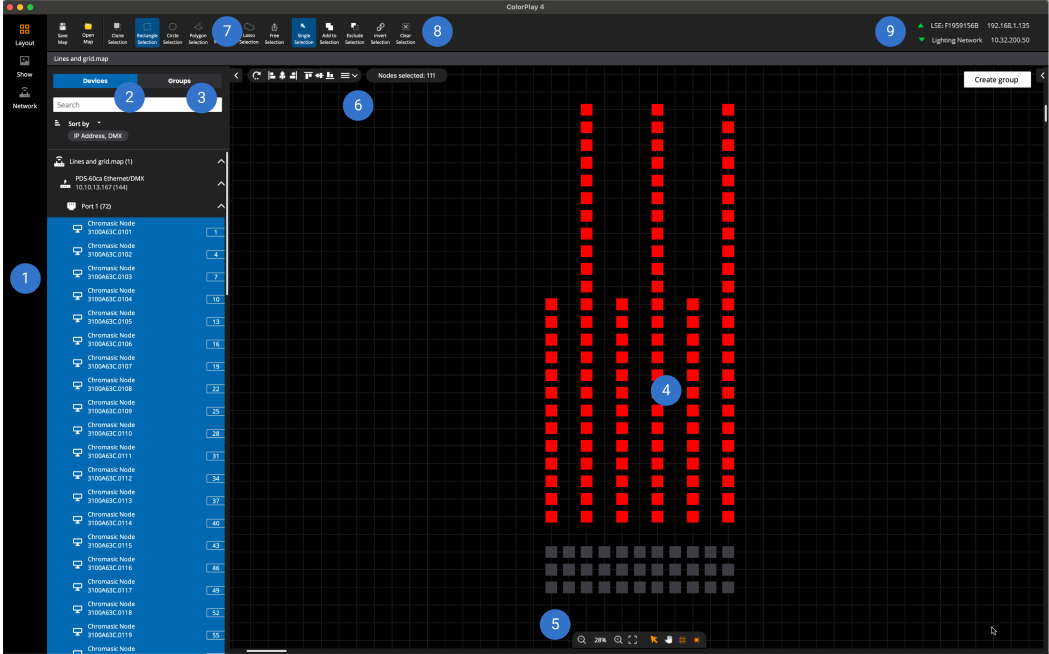
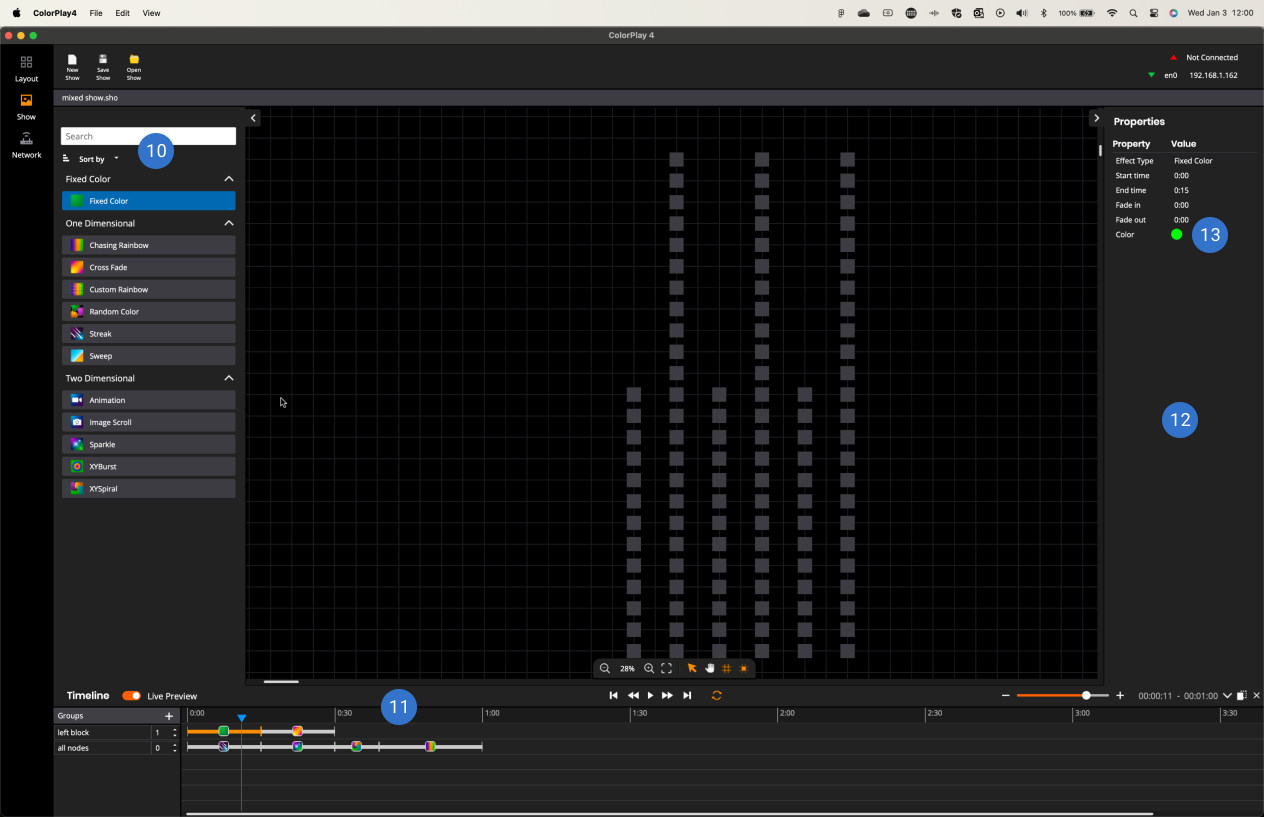
- Workflow Tool
- Device Tree
- Group Tree
- Map Tools - Canvas
- Map Tools
- Alignment Tools
- Shape Selection Tools
- Shape Modifier Tools
- Connection Status Tool
- Effects Tree
- Timeline Tools
- Properties Tool
- Color Control Tools
- Network Tree
- Controller Tree
- Content Management Tool
3. In the Beginning: Importing the Site Topology
Importing the Site Topology into ColorPlay initiates the Content Authoring Process. The Site Topology is created as part of Commissioning Process and consists of a collection of the Light Points with their configurations, the control endpoints, and the DMX Address Maps. This information is crucial for beginning the Content Authoring Process.
Once the Site Topology is created it can be imported using the following steps:
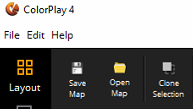
- Click ‘Layout’ in ‘Workflow Tool’
- Main Toolbar displays File I/O Tools, Shape Selection Tools and Shape Modifier Tools.
- Click ‘Open Map’ in File I/O Tools.
- Browse and select the desired ‘Map File’.
- Load the default layout of the light points generated during the commissioning process onto Canvas Tool
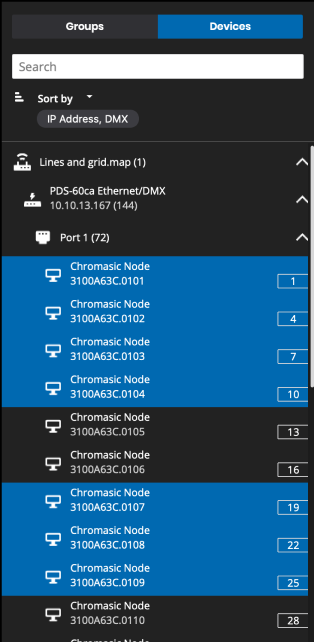
- Load the hierarchical topology of Light Point(s) and the PDS they are connected to onto Device Tree.
- Loads the default group(s) (One Group per Port on PDS) onto Group Tree.
Search Devices in Device Tree
The user selects the input field and enters text. After 2+ characters are entered, results with matching strings in the name, serial, or IP address are displayed. In each result, the matching sections of the string are bolded. When there are matching luminaires, the parent device is also shown in the results to indicate the device hierarchy.
Sort Devices in Device Tree
ColorPlay 4 includes a sort order menu and a single toggle selection for ascending/descending order. When devices are reordered, the device hierarchy is always preserved—child devices always appear under the corresponding parent device. Networks are not sortable and appear in the default system order always. The sort options from the menu are:
- Ethernet devices
- IP address (default)
- Name
- Serial
- Type
- Luminaires
- DMX (default)
- Serial
- Name/Type
- Location
Step 1: Layout Creation
Creating the layout is the first main step of content authoring process. It establishes the general structure of your light show, and serves as the foundation for content creation.
Layout Creation constitutes the following steps that can be performed in any order.
- Organize the position of Light Point(s) on the Canvas.
- Create/Modify Group(s) containing one or more Light Points.
- Use Map Tools to adjust the viewport of the Canvas.
Tools used in this workflow are
- Device Tree
- Group Tree
- Map Tools
- Zoom Tool
- Fit to Screen Tool
- Select Tool
- Move Tool
- Pan Tool
- Background Tool
- Gridlines Tool
- Alignment Tools
- Horizontal Alignment:
- Align Left Tool
- Align Center Tool
- Align Right
- Vertical Alignment:
- Align Top Tool
- Align Middle
- Align Bottom
- Even Distribution:
- Distribute Horizontally
- Distribute Vertically
- Distribute to Grid
- Rotation:
- Rotate Clockwise
- Rotate Counterclockwise
- Rotate by Angle
- Flip Horizontal
- Flip Vertical
- Horizontal Alignment:
- Shape Selection Tools
- Rectangle Tool
- Circle Tool
- Polygon Tool
- Arc Tool
- Lasso Tool
- Freeform/Pen Tool
Shape Modifier Tools
- Single Selection Tool
- Add to Selection Tool
- Exclude Selection Tool
- Clear Selection Tool
- Connection Status Tool
- Upstream Connection Status
- Downstream Connection Status
Organize the position of Light Point(s) on the Canvas
Default Layout created in Commissioning Process organizes the light point(s) as follows:
- One row per port on the PDS
- Light Point(s) on a PDS are laid out sequentially in the row following the order of their DMX Address
Organizing the position of Light Point(s) to match the layout of the site makes the content creation process intuitive and relevant. This may be achieved be executing the following steps:
- Select Light Point(s)
- Position Light Point(s)
- Align Light Point(s)
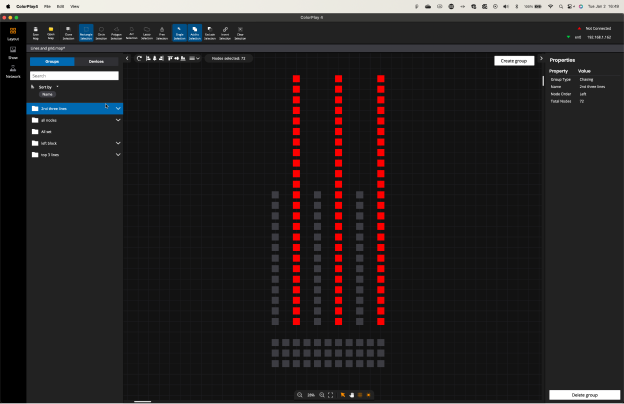
Select Light Point(s)
Selecting a desired set of light point(s) can be done using either Map Based Selection or Device Tree Based Selection.
Map Based Selection:
- Use ‘Select Tool’ to set the context to selecting light point(s).

- Use any of the ‘Shape Selection Tools’ to select a desired set of light points.
- Use any of the ‘Shape Modifier Tools’ to select a complex set of light points by adding to the selection or excluding from the selection.
- Use ‘Select Tool’ to set the context to selecting light point(s).
- Device Tree Based Selection:
- Use ‘Device Tree’ to select one or more light point(s).
- Use ‘Device Tree’ to select one or more light point(s).
Review the selected light point(s) on the canvas.
Position Light Point(s)
Selected Light Point(s) can be moved to desired position using ‘Move Tool’.

There are two modes of moving the selection
- Using the mouse, click at a desired relative position on canvas.
- Using the Keyboard, use the arrow keys to move the selection in steps on canvas.
Review the positioning of selected light point(s) on the canvas.
Align the Light Point(s)
Selected Light Point(s) can be aligned using the ‘Alignment Tools’.

Review the alignment of selected light point(s) on the canvas.
Create Group(s) containing one or more Light Point(s)
Default Groups are created during the commissioning process. One group per port of the PDS is created by default.
Group(s) are essential to apply a dynamic color changing light effect to. Creation of new Group(s) of Light Point(s) can be achieved using the following steps:
- Select Light Point(s).
- Define the order of Light Point(s) in the Group.
Select Light Point(s)
Refer to the section on Select Light Point(s).
Define the order of Light Point(s) in the Group
Order of the light point(s) in the Group determines the progress of the light effect applied to the group. Available options are:
- Click Order
- Define Order
Light Point(s) in a Group can be ordered based on an anchor point and the direction of sequence.- Top
- Bottom
- Left
- Right
- Top Left
- Top Right
- Bottom Left
- Bottom Right
Step 2: Content Creation
Content Creation is the second and most important step in the content authoring process. This step involves using the Group(s) created during Layout Creation and the available light effects in the Effects Library to create a Light Show.
Tools used in this workflow are:
- Effects Tree
- Timeline Tools
- Color Control Tools
- Properties Tool
Content Creation is an iterative process of the following steps applied to create a timeline of Light Show with desired light effect(s) on group(s)
- Apply Light Effect to a Group
- Set Color
- Adjust Light Effect Properties
- Adjust the Timeline
Apply Light Effect to a Group
A Light Effect can be applied to a group in two ways
- Drag and Drop Light Effect on the Canvas
- Drag and Drop Light Effect on the Timeline
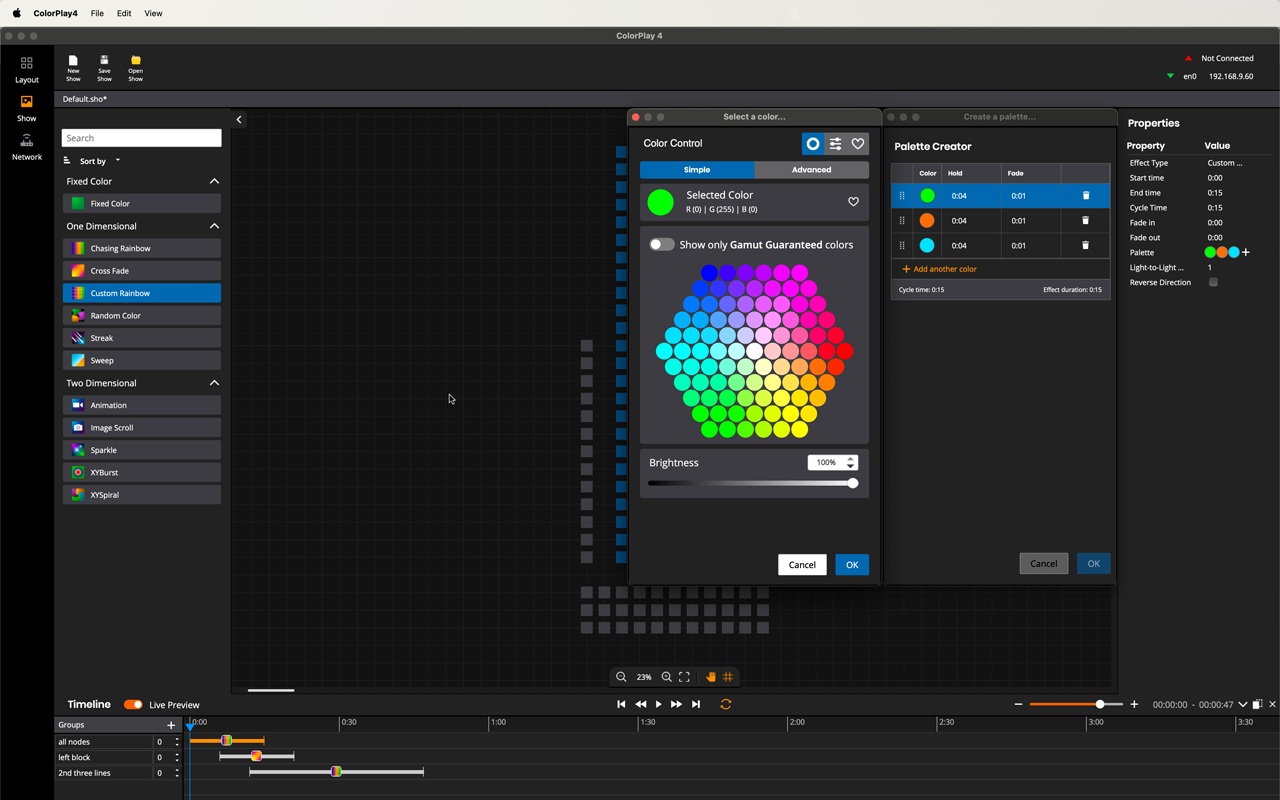
Set Color
One of the important of properties of a Light Effect is to set a desired color. This can be achieved using two different ways:
- Color Control Mode
- Channel Control Mode
Color Control Mode
Color Control Tool ensure the Color Selection is always consistent across different families of luminaires. This is achieved using Chromasync 3 Technology that is aimed at ensuring accuracy of the color, consistency of pastel colors, leverage full saturated color capability of the luminaires and high-quality whites in IntelliHue families.
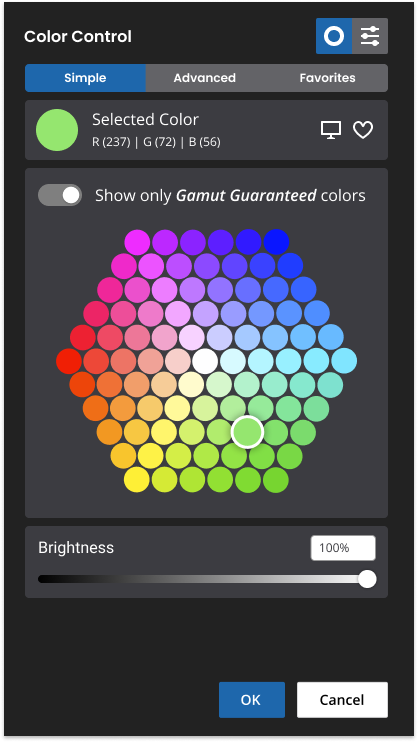
Color Control Mode has 3 Tools:

- Simple Color. Simple color selection tool allows the user to select a color from a predefined palette of colors.
- Selected Color. Color Information about the currently selected color:
- Color Preview. Visual representation of the currently selected color (large swatch in selected color panel)
- RGB Values. Digital representation of the currently selected color in DMX Values. (under selected color heading in selected color panel)
- Luminaire preview. Toggle On/Off to Launch Luminaire Preview Widget to preview the channel levels used by the luminaire (s) to render the selected Color. (monitor icon)
- Add to Favorites. Add/Remove the currently selected color to favorites panel. (heart icon)
- Color Palette
- Gamut Guaranteed. Toggle On/Off for palette of colors that are guaranteed to be consistent across all family of luminaires.
- Color Palette
- Complete Color Palette
- Gamut Guaranteed Color Palette - Palette of Colors that are guaranteed to be consistent across all family of luminaires. This is represented by disabling the saturated colors for selection.
- White Palette
- Brightness slider
- Selected Color. Color Information about the currently selected color:
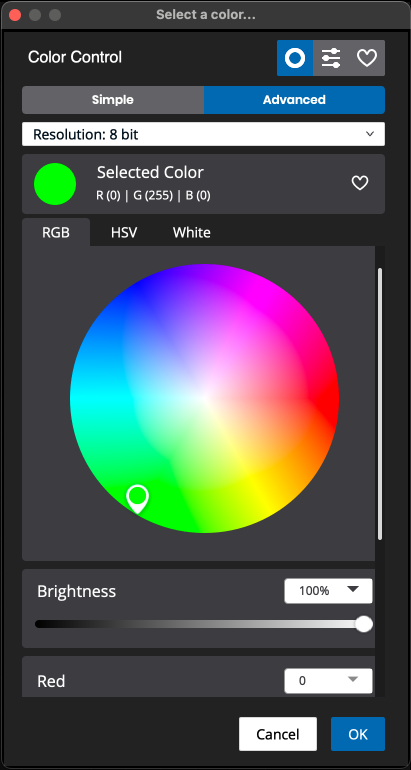
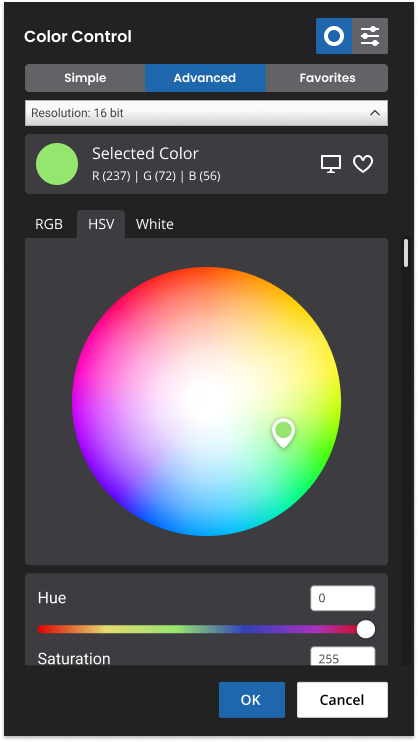
- Advanced Color. Advanced color selection tools allow the user to specific the exact desired color using Color Resolution, Color Spec (RGB, HSV and White), Color Wheel, Black Body Curve and/or Sliders.
- Resolution
- 8 bit
- 16 bit
- Dimming Percent %
- Selected Color. Color Information about the currently selected color.
- Color Preview. Visual representation of the currently selected color
- RGB Values. Digital representation of the currently selected color in DMX Values.
- Luminaire Preview. Toggle On/Off to Launch Luminaire Preview Widget to preview the channel levels used by the luminaire(s) to render the selected Color.
- Add to Favorites. Add/Remove the currently selected color to favorites panel.
- Color Spec Selector. Color can be specified in RGB, HSV or White Spec
- RGB
- Color Wheel - Circular color wheel to select the desired color by Click / Drag a point on the circular color wheel.
- Color sliders - Sliders and/or Spin boxes provide the precise control over the selection of desired color.
- RGB sliders - Range depends on the Selected Color Resolution. (0 - 255 / 0 - 65535/ 0 - 100)
- RGB spin boxes - Range depends on the Selected Color Resolution. (0 - 255 / 0 - 65535/ 0 - 100)
- Modifiers - Modifiers can be used to add additional variation to the selected RGB values.
- Warmth - This modifier has an effect of adding amber to the selected RGB values to make it warmer / cooler.
- Desaturate - This modifier has an effect of adding white to the selected RGB values to make it desaturated / saturated.
- Modifiers - Modifiers can be used to add additional variation to the selected RGB values.
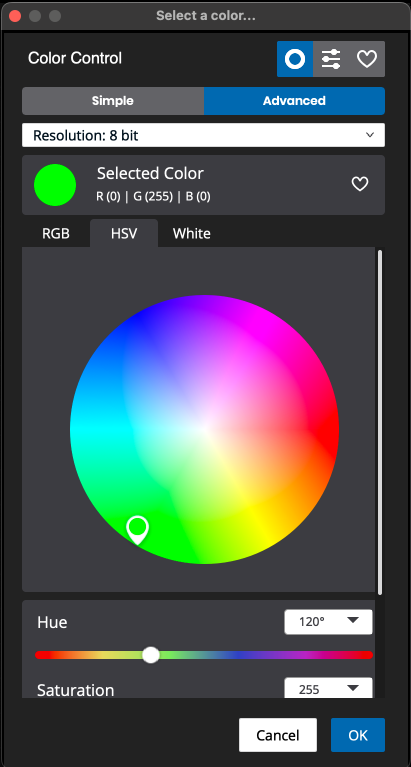
- HSV
- Color Wheel - Circular color wheel to select the desired color by Click / Drag a point on the circular color wheel.
- Color Sliders
- HSV Sliders - Hue Range (0 - 360), Saturation Range (0-255) and Value/Intensity Range (0 - 255)
- White
- Black Body Curve - Black body curve representing different CCT and Tint guidelines
- White sliders
- CCT - Color Temperature range (2,000 - 10,000) (Refer to Chromasync 3 Spec for confirmation / details)
- Tint - Tint Range (-100 - 100: 0 in the center)
- Brightness - Range (0 - 100%) (Refer to Chromasync 3 Spec if this can be available in RGB Spec too )
- RGB
- Resolution
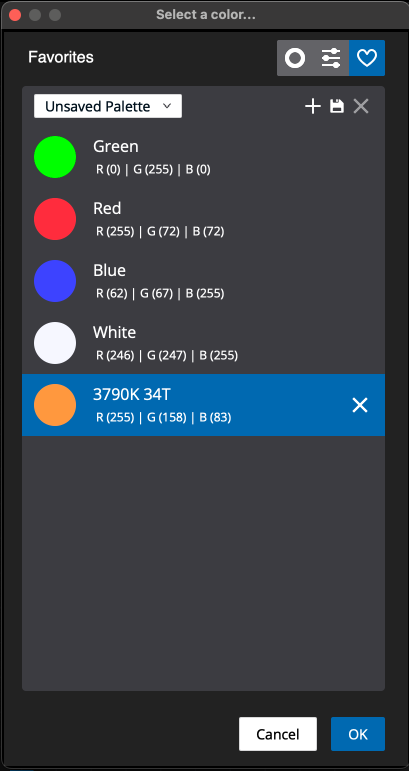
- Favorites
- Gamut guaranteed toggle (negotiable)
- Palette creation (default state Unnamed palette)
- Save palette (if unnamed, modal to enter name)
- Delete palette
- Color tile display
- Selected color highlighted in blue
- Luminaire preview
- Delete color from palette
Channel Control Mode
Channel Control give full channel level control to the user. Chromasync is turned off if the user operates in this more. No color conversions are done.
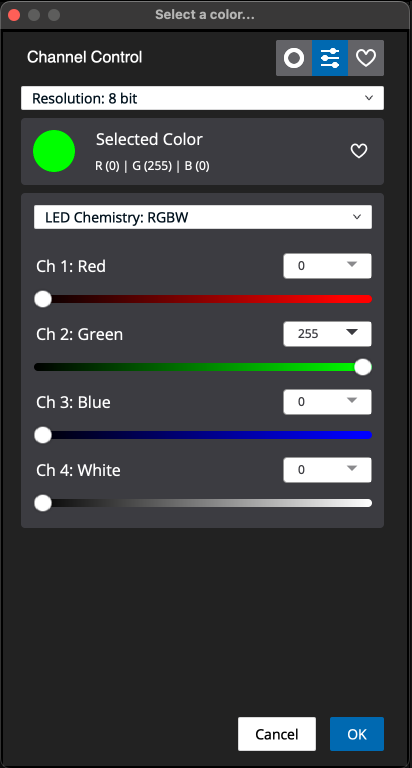
- Resolution
- 8 bit
- 16 bit
- Selected Color. Color Information about the currently selected color.
- Color Preview. Visual representation of the currently selected color.
- Channel Values. Digital representation of the currently selected channel values.
- LED Chemistry. Options include RGB, RGBW, RGBA, RGBAW
- Channels
- Appropriate sliders If RGB, RGBW, RGBA, or RGBAW LED Chemistry is Selected.
Adjust Light Effect Properties
Properties Tool presents with the available properties that can be configured on a Light Effect. Some of the common properties on Light Effects are listed below:
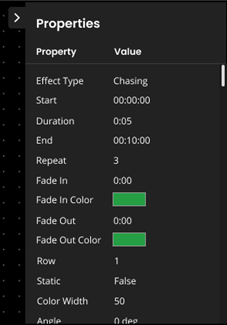
- Start time of effect on the timeline (HH:MM:SS). Editing the Start property shifts the effect on the timeline and automatically updates the End property.
- Duration of effect on the timeline (HH:MM:SS). Editing the Duration property resizes the effect on the timeline and automatically updates the End property.
- End time of effect on the timeline (HH:MM:SS). Editing the End property resizes the effect on the timeline and automatically updates the Duration property.
- Fade In Duration of fade in from the color selected in the Fade In Color property (HH:MM:SS).
- Fade In Color Color to fade in from, using the duration set in the Fade In property. You change the color using the Palette Editor.
- Fade Out Duration of fade out to the color selected in the Fade Out Color property (HH:MM:SS).
- Fade Out Color Color to fade out to, using the duration set in the Fade Out property. You change the color using the Palette Editor.
Adjust the Timeline
Timeline lets you sequence, transition, set the start time, end time, and duration of, and fine-tune effects. You can stack multiple effects on the same group of nodes, creating complex, multi-layered light shows.
The timeline is a visual representation of the sequence of effects in a show. Tick marks divide the timeline into regular intervals. You can use the Timeline Zoom Slider to bring a larger or smaller portion of a show into view.
The timeline lets you change many effect properties using simple drag-and-drop actions. In the timeline, you can:
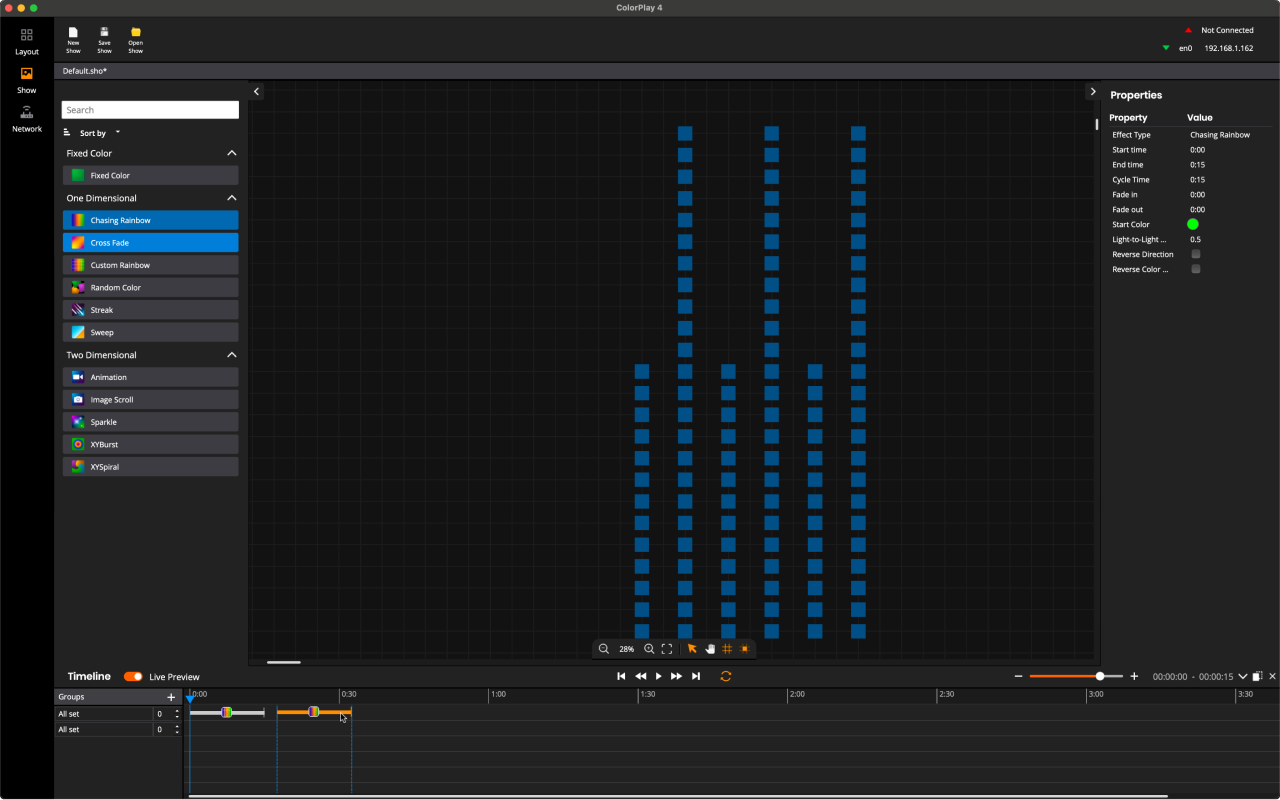
- Add, duplicate, and delete effects
- Set effect start time, end time, and duration
- Assign multiple timeline rows to a group for effect stacking
- Change the priority of stacked effects
Content Playback
Content playback helps the light show you’ve created from your laptop and studio and gets it ready for presentation to your audience by adjusting the speed and cadence of key effects.

Play / Pause of Content
- Mouse Interaction: Click on Toggle Play /Pause Button
- Keyboard Interaction: Space Key to Toggle Play/Pause
Configurable Frame rate
- Min: 5 FPS
- Max: 60 FPS
- Default: 40 FPS
- Keyboard Interaction: Alt + '+' sign (UI Design to finalize Keyboard Shortcut)
Simulated Feedback on Canvas
Seek Timeline
- Seek forward by seek factor of time (UI Design to finalize the seek factor)
- Mouse Interaction: Click on the Seek Forward Button
- Keyboard Interaction: Alt + --> (Right Arrow) Keys
- Seek to the beginning of next effect.
- If there are multiple timeline rows with staggered effects, then seek to the beginning of the first among available next effects on timeline.
- Mouse Interaction: Click on the Seek to Next Button
- Keyboard Interaction: Alt + --> --> (Two times Right Arrow) Keys
- Seek backward by seek factor of time (UI Design to finalize the seek factor)
- Mouse Interaction: Click on the Seek Backward Button
- Keyboard Interaction: Alt + <-- (Left Arrow) Keys
- Seek to the beginning of next effect.
- If there are multiple timeline rows with staggered effects, then seek to the beginning of the first among available next effects on timeline.
- Mouse Interaction: Click on the Seek to Next Button
- Keyboard Interaction: Alt + <-- <-- (Two times Left Arrow) Keys
- Seek to the Marker
Loop
Step 3: Content Management
The final step of the content authoring process involves managing the content that you create. This stage helps keep content available, so it can be easily managed, updated, and shared.

Downstream Connection
Downstream Connection represents the lighting network with the computer running ColorPlay 4, PDS and luminaires.
The Network Tree Tool can be used to select the network interface on your computer that is connected to the Lighting Network.
Downstream Connection is used by ColorPlay 4 to send the light data to the devices in Content Playback Workflows.
Status ( Disconnected / Connected ) of the Downstream Connection is represented in the Connection Status Tool
Upstream Connection
Upstream Connection represents the control network over LAN or Internet with the computer running ColorPlay 4, Playback Controller.
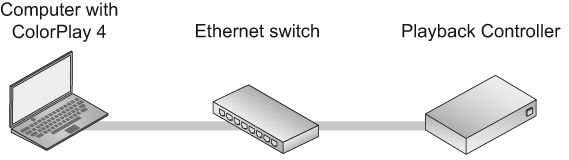
The Controller Tree Tool presents you with a list of local controllers discovered from the computer running ColorPlay 4.
The Controller Tree Tool can be used to select the Playback Controller for Upstream Connection. Upstream Connection is used by ColorPlay 4 to upload the content to Playback Controllers in Content Management Workflow.
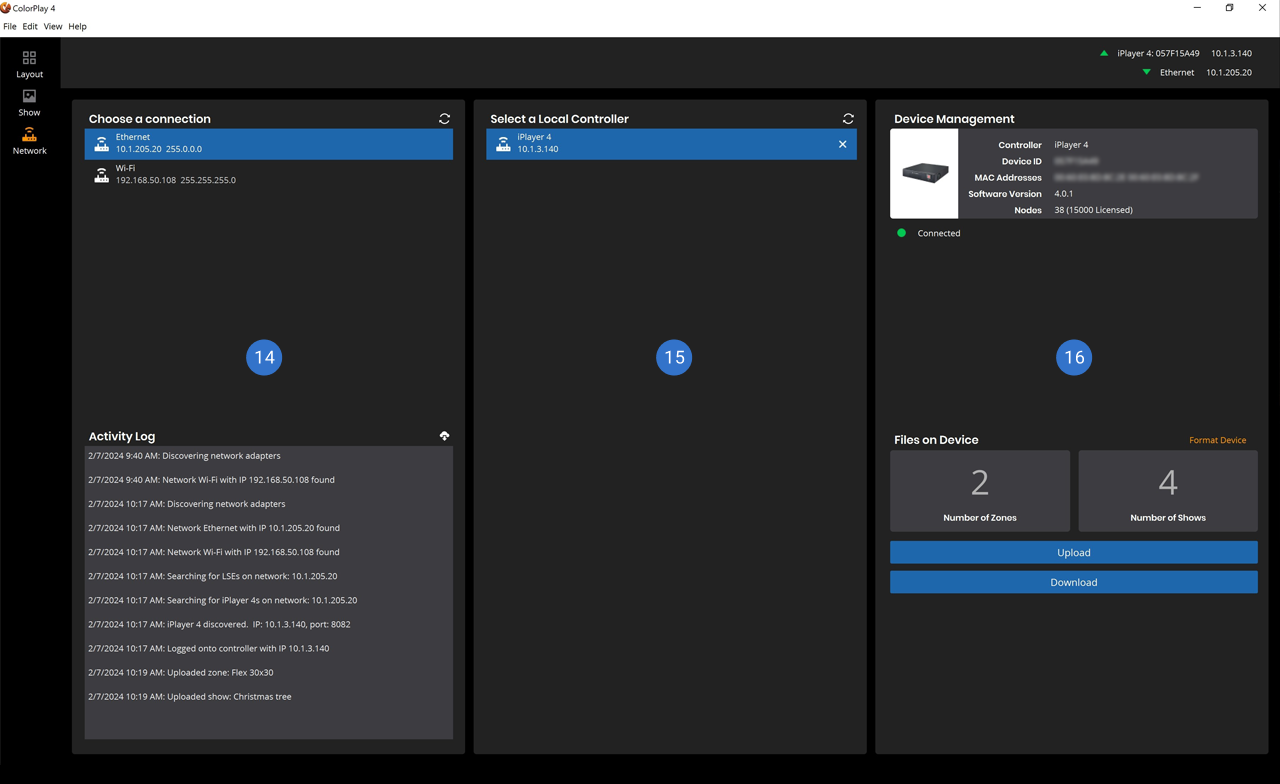
Local Controllers
Playback Controllers present in the Local Area Network. Playback Controllers can be auto-discovered or added manually.
Content Management
Device Information
Presents basic information about the selected Playback Controller, such as Type of Controller, Firmware Version and Network Connections.
Content Information
This section provides an overview of the content already presented on the Playback Controller.
Upload / Download Content
ColorPlay 4 can provide the capability to upload/download the content to/from the selected Playback Controller.
ColorPlay 4 provides the unique capability of upload/download the content to/from an Interact Controller over the Internet.
Conclusion: Bringing New Creativity to Light
ColorPlay 4 is part of Color Kinetics’ commitment to empowering lighting designers and other content creators with the capabilities they need to create great light shows.
Creating fantastic light shows and lighting effects used to mean complication, repetition—and frustration for lighting designers and their teams. It used to require long hours (or days) on-site to bring a lighting design to life. Not anymore. With the complete Color Kinetics creation and control portfolio—including QuickPlay Pro 2 for advanced device control and ColorPlay 4 for content authoring—we do away with the drudgery so you can focus on creating fantastic light shows and lighting effects. Easy-to-use tools and an intuitive user interface add up to a great experience.
This initial version of ColorPlay 4—as described in this Quick Start guide—is just the beginning. There’s much more ahead as we continue to deepen the capabilities of the complete Color Kinetics creation and control portfolio.
How Did We Do?